This is more of a tutorial more than it is a share. Well, it’s both really…
We’ve all been on one of “those” maps that looks as though someone took a whole 60 minutes to throw together. It’s unprofessional to list any examples, however, we’ve all been on one throughout our enjoyment of Farming Simulator. One of the things that really lites my ass is trees. Personally… I hate it when map makers don’t shimmy the trees to break the uniformity instead of looking like you took a tree stamp and just stamped out a bunch of the same looking trees.
Here is what I mean. (this is off my map)


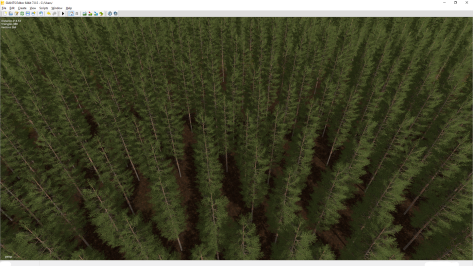
Take a look at the screenshots above. Come on now… tell the truth. You too have seen maps like this. It truly is a matter of personal preference I guess. This is a common practice between map makers and I would only hazard a guess it’s because this way takes less effort. I myself have to take breaks or I will get burnt out on trees in a hurry. So, in a perfect world, the effect that we as map makers should be striving for to go that extra mile is like the screenshots below.


You can see by these screenshots that there is no uniformity between the trees anywhere in the line now. There are several little tricks to accomplish this and yes… adds time to your map making, but the effect it has in the map in my opinion, is well worth it.
The very first thing I will do when I install a forest is use different heights of the tree. So for example, If I have access to a pine1, pine2, pine3, pine4, and a pine5, I will use a large random mix of 3-5 with some pine2s here and there. It does fairly well at breaking the uniformity if you do nothing else.
As I write this, I am thinking about a map that was released recently in which all the pine trees that were installed were all pine5s (pictured below). Granted the author had the forest going over hills and what not and it didn’t look as bad as the example on my own map… but you could see it. Every pine tree was exactly the same. So change them up. Use pine trees 2-5 if you have them and throw in a dead tree here and there.
(I‘d like to make something crystal clear here. The author of this map, which I took the liberties to hide the identity of, made an absolutely stunning map. A map so beautiful… If I haven’t spent so much time making my own, this would be the map I would be playing for a very long time and would love the hell out of. I show this picture as an example of the uniformity in the trees on maps ONLY and what can be done to break that uniformity. My hat is off to the author… crazy good job. We need more map makers like you.)
The next way break the uniformity is to add or subtract height, width and length. You would better know these by X, Y, and Z values. If the trees are cookie cutter, you’ll see it in the trees. It only takes slight variances to break up the uniformity.
The screenshots below is how to change the X, Y and Z values. Personally, I use method one. It is the easiest and puts just the right amount of chaos into your forest. When you’re going through your trees, put your cursor onto the little square between the X, Y and Z arrows and move the mouse left and right while holding down the left mouse button. That allows you to affect all three axis and change their values at the same time. I usually stay in a box of + / – 10%. That’s not too crazy of a push and gives you a great foundation to break the uniformity.


The second screenshot shows how to change the X, Y and Z values in the Attributes panel to achieve the same effect as in using method one. Again, I stay in a box +/- 10%. So a 1 value is default size.. I’ll go anywhere between a .9 and a 1.1. Again… method 1 is a lot easier. Method two requires you to hand type in the values to affect change. (which is what I was doing for some time before realizing I could do it on the gizmo).
But breaking the uniformity doesn’t stop there. The screenshots at the top are of the tree farm on the map I am creating and all my trees are planted in a line (which I’ve seen done in many maps), so as you’re going down the line you might want to nudge the tree either a little forward, little backward, left or right. Not to much… just enough to reach the desired effect. This way the trees aren’t in a uniform line.
The last thing I do to trees is rotate them either clockwise or counter clockwise. If you take a look at the before screenshot above where the “gizmo” is centered in the picture… I’ll grab the horizontal ring (shown in green) and spin it randomly left or right to achieve the desired effect. This way you’re not looking at the same side of the tree as you look into the forest.
So that is four ways to break the uniformity of the trees on your map. Easiest of all of them is grab the tree and spin the Y value randomly left or right, you can use different size trees, you can nudge the tree forward, backward, left or right (in a forest… this is most likely not needed) and the one that I think is the most important is to change the tree’s physical features by adjusting it’s X, Y and Z values to achieve the desired effect.
The benefit of changing your trees values are a more realistic looking map. In the real world, you will find it impossible to find two trees exactly alike. So why not do that in the maps? The other benefit is more tree to use. Players will have a pine5 tree pushed to a 1.1 or more and that is 10% more tree. That means more money. It also challenges players to work for their money. If the forest is all 3s and 4s with the occasional 5 or 2, the player has to work around the other trees to get the ones they want (or just clear cut the whole lot and chip the ones you don’t want to turn into lumber).
The down side is it does in fact add time to your map making. I know, trust me. I personally would rather spend more time making mountains, roads and bridges than installing a few thousand trees. After the first few hundred or so, I’m wanting to pull my hair out, however, if you find yourself creating a map where your trees all look the same… you might just want to go in and add some good ol’ fashioned chaos in the mix by using one or more of the methods above.
Hope this helps and current or would-be map makers. Until next time…
~Cheers

Good explanation of how to get a more natural look to groups of trees. I’m just getting to the point where I’m placing larger groups of trees so this is timely advice for me. Do you segregate groups of trees into multiple transform groups? I seem to remember reading that doing so improves performance but I haven’t tested it out.
LikeLike
Hello Chasey. Thanks for the question. Yes, I have made several groups of trees into separate transform groups. I heard the same thing and didn’t start doing it until I has knee deep in the map and had already planted a couple thousand trees. I’m not aware if it makes any real difference in performance or not as I haven’t noticed any drop in frames. The one thing that I will say is concentrate your efforts on the outer bands of the trees where they are really noticeable. For me, along the interstate highways and roads and especially around the home farm. I am really glad this helped you. Let me know if I can be of further service. ~Cheers
LikeLike